Step-by-Step Guide to Generate Dynamic Documents with Salesforce Data Integration
Description:
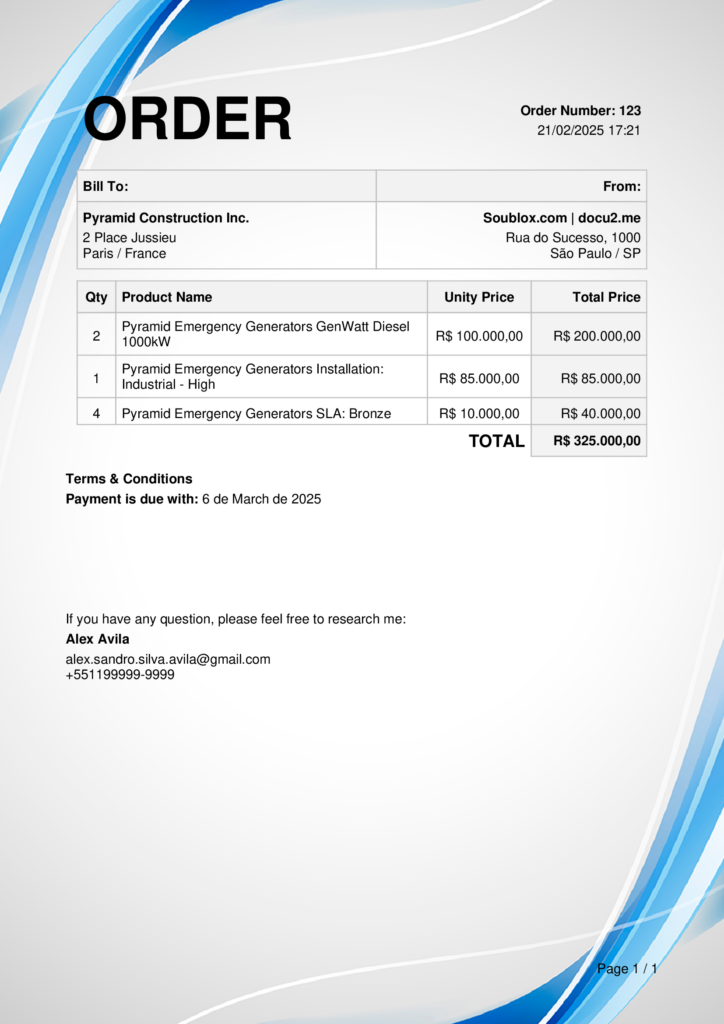
This detailed guide teaches you how to create an “Order” template in Salesforce using the Docu2.me tool. Learn how to integrate dynamic fields, manage resources like “Dataset” and “Variables,” and automate the generation of professional documents directly within Salesforce. The process includes creating dynamic tables, configuring flows, and generating personalized PDFs based on opportunity data and related objects.
1. Introduction to the “Order” Template
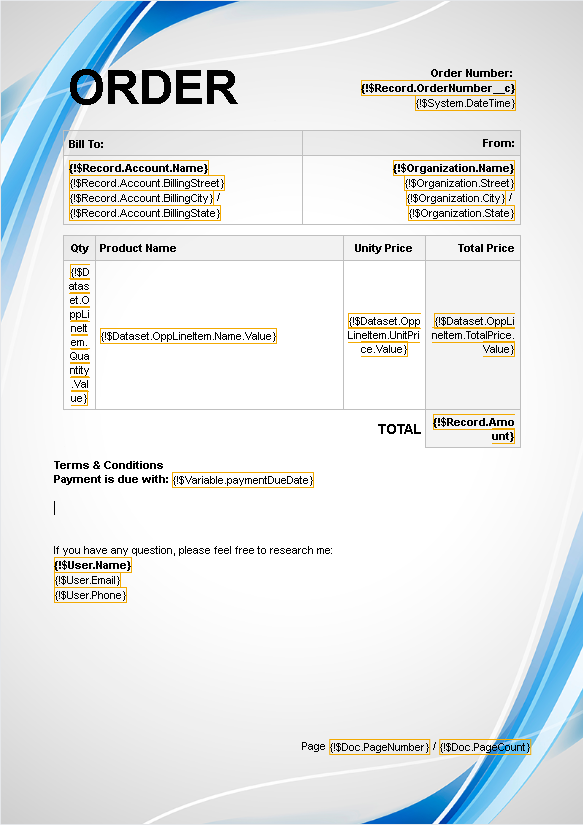
The “Order” template is designed to streamline the creation of professional and dynamic documents within Salesforce. By leveraging docu2.me, users can generate customized orders that automatically pull data from Salesforce records, such as opportunities, accounts, and related products. This ensures accuracy, consistency, and efficiency in document creation.
Key Features of the Template:
- Dynamic Fields: Automatically populate fields like order number, customer details, product information, and payment terms.
- Integration with Salesforce Data: Directly access and display data from Salesforce objects, including opportunities, accounts, and line items.
- Customizable Layout: Use tables, headers, and formatting tools to create a professional and visually appealing document.
- Automation: Automate the generation of PDFs with predefined templates and dynamic data.
Fields Used in the Template:
Here are the key dynamic fields integrated into the “Order” template:
- Order Number: {!$Record.OrderNumber__c}
- Current Date: {!$System.DateTime}
- Customer Name: {!$Record.Account.Name}
- Customer Address: {!$Record.Account.BillingStreet}, {!$Record.Account.BillingCity}, {!$Record.Account.BillingState}
- Product Details:
- Quantity: {!$Dataset.OppLineItem.Quantity.Value}
- Product Name: {!$Dataset.OppLineItem.Name.Value}
- Unit Price: {!$Dataset.OppLineItem.UnitPrice.Value}
- Total Price: {!$Dataset.OppLineItem.TotalPrice.Value}
- Total Order Amount: {!$Record.Amount}
- Payment Due Date: {!$Variable.paymentDueDate}
- Responsible User:
- Name: {!$User.Name}
- Email: {!$User.Email}
- Phone: {!$User.Phone}
- Page Numbering:
- Current Page: {!$Doc.PageNumber}
- Total Pages: {!$Doc.PageCounter}
Why Use This Template?
- Efficiency: Reduces manual data entry by automatically pulling information from Salesforce records.
- Accuracy: Ensures data consistency by using real-time Salesforce data.
- Professionalism: Creates polished and standardized documents for clients and internal use.
- Flexibility: Easily customizable to meet specific business needs.
At the end of this section, you’ll find an illustrative image showing the structure of the “Order” template and how dynamic fields are integrated.
2. Creating the Template in Docu2.me
Creating the “Order” template in Docu2.me is a simple and intuitive process. This topic will guide you step by step through the creation of the template record and initial setup.
Steps to Create the Template:
- Access Docu2.me:
- Log in to Salesforce and navigate to the Docu2.me homepage under the “docu2.me Home” tab.
- Create a New Template:
- In the “docu2.me Template” tab, click “New” to create a new record.
- In the pop-up, fill in the “docu2.me Template Name” field with the name “Order Template”.
- Click “Save” to save the record.
- Verify the Created Record:
- After saving, the record will be displayed with the name “Order Template”.
- Note that, at this point, there are no documents associated with the template yet.
- Create a New Document:
- To create a document related to the template, go to the related records and choose the “New” option in “docu2.me Files” (located in the “docu2.me Related List” component) or click “Edit with Docu2.me” in the “Highlights Panel”.
- A new document will be created in the Docu2.me editor.
Important Notes:
- The template record serves as a central point to manage all related documents.
- Ensure the template is named clearly and descriptively for easy future identification.
At the end of this section, you’ll find an illustrative image showing the process of creating the template in Docu2.me.
3. Locating the “Order Template” Document
After creating the template, it’s important to know how to locate it in Docu2.me for future editing or use. This topic explains how to find the “Order Template” document in the Docu2.me interface.
Steps to Locate the Document:
- On the Docu2.me Homepage:
- After creating the template, you can find it in the “Recents Documents” section of the Docu2.me homepage (“docu2.me Home”).
- Hover over the “Order Template” document to see the available options:
- Rename: Rename the document.
- Remove: Delete the document.
- Open in new tab: Open the document in a new browser tab.
- In the “docu2.me Templates” Tab:
- Navigate to the “docu2.me Templates” tab.
- Locate the “Order Template” record.
- In the “docu2.me Related List” component, you’ll see the associated document under “docu2.me Files”.
- Opening the Document:
- Click on the document to open it in the same tab or use the “Open in new tab” option to open it in a new tab.
Important Notes:
- Organize your templates and documents clearly for easy future access.
- Use the rename and delete options to keep your document list updated.
At the end of this section, you’ll find an illustrative image showing how to locate the “Order Template” document.
4. Configuring the Document in the Docu2.me Editor
After creating the template, the next step is to configure the document in the Docu2.me editor. This topic will cover inserting a watermark, formatting tables, and preparing the document layout.
Steps to Configure the Document:
- Rename the Document:
- In the top-left corner of the editor, the document will have the default name “Untitled Document”.
- Rename it to “Order Template” for easy identification.
- Insert a Watermark:
- In the “Insert” menu, select the “Watermark” option.
- In the side panel that appears, configure the following options:
- Select an Image: Choose an image from your device to use as a watermark.
- Scale: Adjust the size of the image.
- Rotate: Rotate the image if needed.
- Brightness and Contrast: Adjust the brightness and contrast of the image.
- Transparency: Set the transparency of the watermark.
- Remove Watermark: Use this option to remove the watermark if necessary.
- Create Tables to Organize Content:
- In the “Toolbar Tools” menu, select “Insert Table”.
- Create a table with 1 row and 2 columns for the document header.
- In the first column, insert the text “ORDER”, and in the second column, insert “Order Number”.
- Format the table by removing borders and adjusting text alignment.
- Add More Tables for Order Details:
- Create a second table with 2 columns and 1 row for customer details (“Bill To”) and company details (“From”).
- Create a third table with 4 columns and 3 rows to list products, including fields like “Qty”, “Product Name”, “Unit Price”, and “Total Price”.
- Insert Additional Text:
- Below the tables, add text such as “Terms & Conditions”, “Payment is due with:”, and “If you have any questions, please feel free to contact me:”.
Important Notes:
- Keep the layout clean and professional, using consistent formatting.
- Use Docu2.me’s formatting tools to align text, adjust fonts, and apply styles.
At the end of this section, you’ll find an illustrative image showing the document configuration in the Docu2.me editor.
5. Inserting Data into the Table
Now that the document is configured, the next step is to fill the tables with dynamic data. This topic will explain how to insert information from opportunities, products, and other related fields directly into the document.
Steps to Insert Data into the Table:

- Fill the Table Header:
- In the first table (1 row and 2 columns), insert the text “ORDER” in the first column.
- In the second column, insert the dynamic field “{!$Record.OrderNumber__c}” to display the order number.
- Add Customer and Company Details:
- In the second table (2 columns and 1 row), insert the text “Bill To” in the first column.
- In the second column, insert the text “From”.
- Below “Bill To”, add the dynamic fields:
- Customer Name: {!$Record.Account.Name}
- Address: {!$Record.Account.BillingStreet}
- City/State: {!$Record.Account.BillingCity} / {!$Record.Account.BillingState}
- Below “From”, add the dynamic fields:
- Company Name: {!$Organization.Name}
- Address: {!$Organization.Street}
- City/State: {!$Organization.City} / {!$Organization.State}
- Fill the Product Table:
- In the third table (4 columns and 3 rows), insert the following headers:
- Qty (Quantity)
- Product Name
- Unit Price
- Total Price
- Fill the rows with dynamic fields from the “OppLineItem” dataset:
- Quantity: {!$Dataset.OppLineItem.Quantity.Value}
- Product Name: {!$Dataset.OppLineItem.Name.Value}
- Unit Price: {!$Dataset.OppLineItem.UnitPrice.Value}
- Total Price: {!$Dataset.OppLineItem.TotalPrice.Value}
- In the third table (4 columns and 3 rows), insert the following headers:
- Add the Total Order Amount:
- In the last row of the table, insert the text “TOTAL” in the third column.
- In the fourth column, insert the dynamic field “{!$Record.Amount}” to display the total order amount.
- Insert Final Texts:
- Below the tables, add the following paragraphs:
- Terms & Conditions: Insert the order’s terms and conditions.
- Payment is due with:: Add the dynamic field {!$Variable.paymentDueDate} to display the payment due date.
- If you have any questions, please feel free to contact me: Add the dynamic fields for the responsible user:
- Name: {!$User.Name}
- Email: {!$User.Email}
- Phone: {!$User.Phone}
- Below the tables, add the following paragraphs:
- Format the Document:
- Adjust alignment, fonts, and spacing to ensure a professional layout.
- Use Docu2.me’s formatting tools to apply consistent styles.
Important Notes:
- Ensure the dynamic fields are correctly linked to Salesforce objects.
- Use the “Resource Manager” to configure datasets and variables if needed.
At the end of this section, you’ll find an illustrative image showing how to insert data into the tables and format the document.
6. Creating a “Screen Flow”
With the document now formatted, the next step is to create a Screen Flow in Salesforce to automate the document generation process. This topic will guide you through the initial setup and creation of the flow.
Steps to Create the Screen Flow:
- Access Salesforce Setup:
- In Salesforce, click the gear icon in the top-right corner and select “Setup”.
- In the left-hand menu, navigate to “Flows” and click “New Flow”.
- Choose the Flow Type:
- In the pop-up window, select the option “Start From Scratch”.
- Choose the flow type “Screen Flow” and click “Create”.
Important Notes:
- This is the first step in building the flow. In the next topics, we’ll add screens, decisions, and actions to complete the automation.
- Save your progress regularly to avoid losing any changes.
At the end of this section, you’ll find an illustrative image showing how to create a new Screen Flow.

7. Adding the “Screen” Element “Generate Quotation”
Now that the Screen Flow has been created, the next step is to add and configure the “Generate Quotation” screen. This screen will allow the user to set the quotation’s validity date and proceed to generate the PDF document.
Steps to Configure the “Generate Quotation” Screen:
- Add the “Screen” Component:
- On the Flow canvas, drag and drop the “Screen” component.
- Name the screen “Generate Quotation”.
- Configure Screen Properties:
- In “Screen Properties”, set:
- Label: Generate Quotation
- API Name: GenerateQuotation
- Description: This screen allows the user to set the validity date for the quotation and proceed to generate a PDF document based on the selected opportunity and template.”
- Configure the Screen Footer:
- In “Configure Footer”, set the navigation options:
- Finish Button: Use the custom label “Preview Quotation”.
- Previous Button: Set to “Hide Previous”.
- Pause Button: Set to “Hide Pause”.
- In “Configure Footer”, set the navigation options:
- Add the Date Field:
- In the component menu, select the “Input” category and drag the “Date” component onto the screen.
- Configure the date field with the following properties:
- Label: “Validity Date”
- API Name: “ValidityDate”
- Require: Check this option to make the field mandatory.
- Default Value**: Select the global variable “$Flow > Current Date”. The default value will be “{!$Flow.CurrentDate}”.
- Click “Done” to save the settings.
Important Notes:
- Ensure the date field is correctly configured to avoid errors in the flow.
- Test the screen to ensure the “Preview Quotation” button works as expected.
At the end of this section, you’ll find an illustrative image showing how to configure the “Generate Quotation” screen.
8. Saving the Flow
Now that we’ve configured the “Generate Quotation” screen, the next step is to save the Flow to ensure all changes are stored correctly. This topic will explain how to save the Flow without activating it, allowing you to continue developing and testing.
Steps to Save the Flow:
- Click “Save”:
- In the bottom-left corner of the Flow editor, locate the “Save” button and click it.
- Fill in the Flow Details:
- In the pop-up that appears, fill in the following fields:
- Flow Label: Generate Quotation
- Flow API Name: GenerateQuotation
- Description: This Flow allows users to generate a quotation document as a PDF. It retrieves opportunity details, applies a predefined template, and exports the document with customizable variables such as the validity date. The process includes a preview step before finalizing the PDF export.
- In the pop-up that appears, fill in the following fields:
- Save the Flow:
- After filling in the fields, click “Save” to store the Flow.
Important Notes:
- Save the Flow regularly during development to avoid losing changes.
- The Flow is not yet active, allowing you to continue editing and testing.
At the end of this section, you’ll find an illustrative image showing how to save the Flow.
9. Adding the “Decision” Component “Validate Validity Date”
Now that the Flow is saved, the next step is to add a “Decision” component to validate the validity date entered by the user. This component will check if the date is not null and is after the current date.
Steps to Add and Configure the “Decision” Component:
- Add the “Decision” Component:
- On the Flow canvas, drag and drop the “Decision” component.
- Name the component “Validate Validity Date”.
- Configure the Decision Properties:
- In “Label”, set the name to “Validate Validity Date”.
- In “API Name”, set it to “ValidateValidityDate”.
- In “Description”, add the following information: “This decision validates the validity date entered by the user. It checks if the date is not null and is after the current date.”.
- Define the Decision Paths:
- Outcome 1:
- Label: Date Before Current Date
- Outcome API Name: DateBeforeCurrentDate
- Condition Requirements to Execute Outcome: All Conditions Are Met (AND)
- Resource: {!ValidityDate}
- Operator: Is Null
- Value: True
- Outcome 2:
- Label: Date Not Entered:
- Outcome API Name: DateNotEntered:
- Condition Requirements to Execute Outcome: All Conditions Are Met (AND)
- Resource: {!ValidityDate}
- Operator: Less Than Or EqualValue: {!$Flow.CurrentDate}
- Outcome 3:
- Label: Valid Date:
- Outcome API Name: ValidDate:
- Condition Requirements to Execute Outcome: All Conditions Are Met (AND)
- Resource: {!ValidityDate}
- Operator: Greater Than
- Value: {!$Flow.CurrentDate}
- Outcome 1:
Important Notes:
- Ensure the decision paths are correctly configured to avoid errors in the flow.
- Test the decision to ensure it works as expected.
At the end of this section, you’ll find an illustrative image showing how to configure the “Decision” component.
10. Adding the “Screen” Element for the “Date Not Entered” Decision
Now that the “Decision” component is configured, the next step is to add an error screen for the “Date Not Entered” decision. This screen will display an error message if the user does not enter a validity date.
Steps to Configure the Error Screen:
- Add a “Screen” Component:
- On the Flow canvas, drag and drop a new “Screen” component.
- Name the screen “Error Screen 1”.
- Configure Screen Properties:
- In “Screen Properties”, set:
- Label: Error Screen 1
- API Name: ErrorScreen1
- Description: This screen is displayed when the validity date is not entered. It prompts the user to enter a valid date.
- In “Screen Properties”, set:
- Configure Action Buttons:
- In “Configure Footer”, set:
- Next or Finish Button: Choose the option Hide Next or Finish.
- Previous Button: Select Use a custom label and set the label to Back.
- Pause Button: Mark as Hide Pause.
- In “Configure Footer”, set:
- Add a Text Component:
- In the “Error Screen 1” screen, add a “Display Text” component.
- Configure the component with the following properties:
- API Name: Pleaseenteravaliditydate
- Text: Please enter a validity date.
- Click “Done” to save the settings.
- Connect the Decision to the Error Screen:
- Connect the “Date Not Entered” path of the decision to the “Error Screen 1” screen.
Important Notes:
- Ensure the error message is clear and informative for the user.
- Test the Flow to ensure the error screen is displayed correctly.
At the end of this section, you’ll find an illustrative image showing how to configure the error screen.
11. Adding the “Screen” Element for the “Date Before Current Date” Decision
Now that we’ve configured the error screen for the “Date Not Entered” decision, the next step is to add an error screen for the “Date Before Current Date” decision. This screen will display an error message if the user enters a date before the current date.
Steps to Configure the Error Screen:
- Add a “Screen” Component:
- On the Flow canvas, drag and drop a new “Screen” component.
- Name the screen “Error Screen 2”.
- Configure Screen Properties:
- In “Screen Properties”, set:
- Label: Error Screen 2
- API Name: ErrorScreen2
- Description: This screen is displayed when the validity date is before the current date. It prompts the user to enter a valid date.
- In “Screen Properties”, set:
- Configure Action Buttons:
- In “Configure Footer”, set:
- Next or Finish Button: Choose the option Hide Next or Finish.
- Previous Button: Select Use a custom label and set the label to Back.
- Pause Button: Mark as Hide Pause.
- In “Configure Footer”, set:
- Add a Text Component:
- In the “Error Screen 2” screen, add a “Display Text” component.
- Configure the component with the following properties:
- API Name: Pleaseenteravalidfuturedate
- Text: Please enter a valid future date.
- Click “Done” to save the settings.
- Connect the Decision to the Error Screen:
- Connect the “Date Before Current Date” path of the decision to the “Error Screen 2” screen.
Important Notes:
- Ensure the error message is clear and informative for the user.
- Test the Flow to ensure the error screen is displayed correctly.
At the end of this section, you’ll find an illustrative image showing how to configure the error screen.

12. Creating Variables
Now that we’ve configured the error screens, the next step is to create the necessary variables to store and manipulate data in the Flow. This topic will explain how to create collection variables, Apex-Defined variables, and simple variables.
Steps to Create the Variables:
- Create an Apex-Defined Collection Variable:
- In the variables panel, click “New Resource”.
- Configure the variable with the following properties:
- API Name: lstVariables
- Data Type: Apex-Defined
- Allow multiple values (collection): Checked
- Apex Class: docu2me__DocumentVariable
- Create an Apex-Defined Variable:
- In the variables panel, click “New Resource”.
- Configure the variable with the following properties:
- API Name: variable
- Data Type: Apex-Defined
- Apex Class: docu2me__DocumentVariable
- Create a Simple Variable:
- In the variables panel, click “New Resource”.
- Configure the variable with the following properties:
- API Name: previewParams
- Data Type: Text
- Create an Input Variable:
- In the variables panel, click “New Resource”.
- Configure the variable with the following properties:
- API Name: recordId
- Data Type: Text
- Available for input: Checked
Important Notes:
- Ensure the variables are correctly configured to avoid errors in the Flow.
- Use the variables to store and manipulate data as needed.
At the end of this section, you’ll find an illustrative image showing how to configure the variables.
13. Adding the “Assignment” Component “Set Quotation Variables”
Now that the variables have been created, the next step is to configure an “Assignment” component to set the values of the variables required for generating the PDF document. This topic will explain how to configure the “Assignment” component to assign values to the variables.
Steps to Configure the “Assignment” Component:
- Add the “Assignment” Component:
- On the Flow canvas, drag and drop the “Assignment” component.
- Name the component “Set Quotation Variables”.
- Configure Assignment Properties:
- In “Label”, set the name to “Set Quotation Variables”.
- In “API Name”, set it to “SetQuotationVariables”.
- In “Description”, add the following text: “This component sets the variables required for generating the quotation PDF, such as the payment due date and validity date. These variables are used to populate the document template.”.
- Set Variable Values:
- In “Set Variable Values”, configure the following assignments:
- Variable: {!variable.name}
- Operator: Equals
- Value: paymentDueDate
- Variable: {!variable.value}
- Operator: Equals
- Value: {!ValidityDate}
- Variable: {!lstVariables}
- Operator: Add
- Value: {!variable}
- Variable: {!previewParams}
- Operator: Equals
- Value: paymentDueDate=
- Variable: {!previewParams}
- Operator: Add
- Value: {!ValidityDate}
- Variable: {!variable.name}
- In “Set Variable Values”, configure the following assignments:
- Save the Settings:
- After configuring the assignments, click “Done” to save the changes.
Important Notes:
- Ensure the variable values are correctly assigned to avoid errors in the Flow.
- Test the “Assignment” component to ensure the variables are populated as expected.
At the end of this section, you’ll find an illustrative image showing how to configure the “Assignment” component.
14. End Flow
Now that we’ve configured the error screens and variables, the next step is to add the “End” component to terminate the Flow in error cases. This topic will explain how to add the “End” component to stop the Flow when an invalid date is entered.
Steps to Add the “End” Component:
- Add the “End” Component for “Error Screen 1”:
- Connect the “Error Screen 1” screen to the “End” component.
- This will ensure the Flow is terminated if the user does not enter a validity date.
- Add the “End” Component for “Error Screen 2”:
- Connect the “Error Screen 2” screen to the “End” component.
- This will ensure the Flow is terminated if the user enters a date before the current date.
- Add the “End” Component for the “Default Outcome”:
- Connect the “Default Outcome” path of the decision to the “End” component.
- This will ensure the Flow is terminated if none of the previous conditions are met.
Important Notes:
- Ensure the “End” component is correctly connected to avoid the Flow continuing in error cases.
- Test the Flow to ensure it is terminated as expected.
At the end of this section, you’ll find an illustrative image showing how to configure the “End” component.
15. Adding the “Get Record” Element for “Get Opportunity Details”
Now that we’ve configured the “End” component, the next step is to add a “Get Record” component to retrieve the details of the opportunity based on the record ID. This topic will explain how to configure the “Get Record” component to fetch the opportunity data.
Steps to Configure the “Get Record” Component:
- Add the “Get Record” Component:
- On the Flow canvas, drag and drop the “Get Record” component.
- Name the component “Get Opportunity Details”.
- Configure Component Properties:
- In “Label”, set the name to “Get Opportunity Details”.
- In “API Name”, set it to “GetOpportunityDetails”.
- In “Description”, add the following text: “This component retrieves the details of the selected Opportunity based on the provided record ID. The retrieved data is used to populate the quotation document.”.
- Configure the Object and Filter:
- In “Get Records of This Object”, select the “Opportunity” object.
- In “Filter Opportunity Record”, configure the following conditions:
- Variable: id
- Operator: Equals
- Value: {!recordId}
- Save the Settings:
- After configuring the component, click “Done” to save the changes.
Important Notes:
- Ensure the filter is correctly configured to retrieve the data of the correct opportunity.
- Test the “Get Record” component to ensure the data is fetched as expected.
At the end of this section, you’ll find an illustrative image showing how to configure the “Get Record” component.
16. Get Document Template
Now that we’ve configured the “Get Record” component to fetch the opportunity details, the next step is to add a “Get Record” component to retrieve the “Order Template” document template. This topic will explain how to configure the “Get Record” component to fetch the template based on the provided name.
Steps to Configure the “Get Record” Component:
- Add the “Get Record” Component:
- On the Flow canvas, drag and drop the “Get Record” component.
- Name the component “Get Document Template”.
- Configure Component Properties:
- In “Label”, set the name to “Get Document Template”.
- In “API Name”, set it to “GetDocumentTemplate”.
- In “Description”, add the following text: “This component retrieves the Document Template Name based on the provided template name. The Template Name is used to generate the quote document.”.
- Configure the Object and Filter:
- In “Get Records of This Object”, select the “docu2.me Template” object.
- In “Filter docu2.me Template Records”, configure the following conditions:
- Variable: Name
- Operator: Equals
- Value: Order Template
- Save the Settings:
- After configuring the component, click “Done” to save the changes.
Important Notes:
- Ensure the filter is correctly configured to retrieve the correct template.
- Test the “Get Record” component to ensure the template is fetched as expected.
At the end of this section, you’ll find an illustrative image showing how to configure the “Get Record” component.
17. Screen “Generate Quotation”
Now that we’ve configured the “Get Record” component to fetch the document template, the next step is to add a document preview screen. This topic will explain how to configure the “Preview Quotation Document” screen to allow the user to preview the document before generating the final PDF.
Steps to Configure the “Preview Quotation Document” Screen:
- Add the “Screen” Component:
- On the Flow canvas, drag and drop the “Screen” component.
- Name the screen “Preview Quotation Document”.
- Configure Screen Properties:
- In “Label”, set the name to “Preview Quotation Document”.
- In “API Name”, set it to “PreviewQuotationDocument”.
- In “Description”, add the following text: “This screen allows the user to preview the quotation document before generating the final PDF. The preview is based on the selected template and opportunity data.”.
- Configure the Screen Footer:
- In “Navigation”, configure the following options:
- Next or Finish Button: Check Use a custom label and set the label to Generate Quote.
- Previous Button: Keep as Use the standard label.
- Pause Button: Choose the option Hide Pause.
- In “Navigation”, configure the following options:
- Add the “docu2.me File Preview” Component:
- On the “Preview Quotation Document” screen, drag and drop the “docu2.me File Preview” component.
- Configure the component with the following properties:
- API Name: quotationDocumentPreview
- Document Id: {!GetDocumentTemplate.Name}
- Record Id: {!recordId}
- Variables: {!previewParams}
- Save the Settings:
- After configuring the screen, click “Done” to save the changes.
Important Notes:
- Ensure the “docu2.me File Preview” component is correctly configured to display the document properly.
- Test the screen to ensure the document is previewed as expected.
At the end of this section, you’ll find an illustrative image showing how to configure the “Preview Quotation Document” screen.
18. Component “Apex Action”
Now that we’ve configured the document preview screen, the next step is to add the “Apex Action” component to generate the PDF file. This topic will explain how to configure the “Apex Action” component to export the document as a PDF.
Steps to Configure the “Apex Action” Component:
- Add the “Apex Action” Component:
- On the Flow canvas, drag and drop the “Apex Action” component.
- In the pop-up window that appears, search for “Export docu2.me Files” and select the action.
- Configure Component Properties:
- In “Label”, set the name to “Export Quotation as PDF”.
- In “API Name”, set it to “ExportDocu2meFile”.
- In “Description”, add the following text: “This component exports the quotation document as a PDF file. The file is generated based on the selected template and opportunity data.”.
- Set Input Values:
- In “Set Input Values for the Selected Action”, configure the following values:
- Export As: PDF
- File name: {!GetOpportunityDetails.Name}
- This can be ContentDocumentId, ContentVersionId or Docu2.me Template Id: {!GetDocumentTemplateName.Id}
- Record Id utilized as the parent of the generated document: {!recordId}
- Variables Values: {!lstVariables}
- In “Set Input Values for the Selected Action”, configure the following values:
- Save the Settings:
- After configuring the component, click “Done” to save the changes.
Important Notes:
- Ensure the input values are correctly configured to avoid errors in generating the PDF.
- Test the “Apex Action” component to ensure the PDF is generated as expected.
At the end of this section, you’ll find an illustrative image showing how to configure the “Apex Action” component.
19. Saving and Activating the Flow
Now that we’ve configured all the components of the Flow, the final step is to save and activate the Flow so it’s ready for use. This topic will explain how to save and activate the Flow.
Steps to Save and Activate the Flow:
- Click “Save”:
- In the top-right corner of the Flow editor, locate the “Save” button and click it.
- Fill in the Version Properties:
- In the “Edit version properties” window, fill in the following fields:
- Flow Label: Generate Quotation
- Flow API Name: GenerateQuotation
- Description: This Flow allows users to generate a quotation document as a PDF. It retrieves opportunity details, applies a predefined template, and exports the document with customizable variables such as the validity date. The process includes a preview step before finalizing the PDF export.
- In the “Edit version properties” window, fill in the following fields:
- Save the Flow:
- After filling in the fields, click “Save” to store the Flow.
- Activate the Flow:
- After saving, click the “Activate” button to make the Flow available for use.
- Confirm the activation in the pop-up window that appears.
Important Notes:
- Ensure all configurations are correct before activating the Flow.
- Test the Flow in a sandbox environment before activating it in production.
At the end of this section, you’ll find an illustrative image showing how to save and activate the Flow.
20. Insert “Dynamic Field” in the “Template Order” Document
Now that the Flow is configured and activated, the next step is to add dynamic fields to the “Template Order” document in Docu2.me. This topic will explain how to insert dynamic fields related to the “Opportunity” object and the system into the document.
Steps to Add Dynamic Fields:
- Open the “Template Order” Document:
- In Docu2.me, open the “Template Order” document that will be used to generate the PDF.
- Add the “Order Number” Field:
- Locate the part of the table where it says “Order Number”.
- Right-click and select the “Dynamic Fields” option.
- In “Select a resource from Global Variables”, choose the “Record (Opportunity)” option.
- In “Record Fields”, select the “Order Number” field.
- The result will be “{!$Record.OrderNumber__c}”.
- Add the dynamic field after the text “Order Number”, resulting in:
- Order Number: {!$Record.OrderNumber__c}
- Add the System Date:
- In the next paragraph, right-click again and select “Dynamic Fields”.
- In “Select a resource from Global Variables”, choose the “System” option.
- In “System Fields”, select the “Current Date” field.
- The result will be “{!$System.CurrentDate}”.
- Add the dynamic field below the “Order Number”, resulting in:
- Order Number: {!$Record.OrderNumber__c}
- Date: {!$System.CurrentDate}
Important Notes:
- Ensure the dynamic fields are correctly configured to avoid errors in generating the document.
- Test the document to ensure the dynamic fields are populated as expected.
At the end of this section, you’ll find an illustrative image showing how to add dynamic fields to the document.
21. Adding “Bill To” and “From” in the Template Table
Now that we’ve added dynamic fields for the “Order Number” and system date, the next step is to add address fields for “Bill To” and “From” in the “Template Order” document table. This topic will explain how to insert dynamic fields related to the “Account” object and the “Organization” object.
Steps to Add Address Fields:
- Add the “Bill To” Fields:
- Locate the part of the table where it says “Bill To:”.
- Add the following dynamic fields:
- {!$Record.Account.Name}
- {!$Record.Account.BillingStreet}
- {!$Record.Account.BillingCity} / {!$Record.Account.BillingState}
- Add the “From” Fields:
- Locate the part of the table where it says “From:”.
- Add the following dynamic fields:
- {!$Organization.Name}
- {!$Organization.Street}
- {!$Organization.City} / {!$Organization.State}
Important Notes:
- Ensure the dynamic fields are correctly configured to avoid errors in generating the document.
- Test the document to ensure the address fields are populated as expected.
At the end of this section, you’ll find an illustrative image showing how to add the “Bill To” and “From” fields to the document.
22. Adding “Dataset” from the “Resource Manager”
Now that we’ve configured the “Bill To” and “From” fields, the next step is to add a “Dataset” to fetch information related to the “Opportunity Product” object. This will allow us to create a dynamic list of products related to the “Opportunity” and insert information such as quantity, product name, unit price, and total price of each item into the template.
Steps to Add the “Dataset”:
- Access the “Resource Manager”:
- In the “Template Order” document, locate the part of the table where the products will be listed.
- Right-click and select the “Resource Manager” option.
- Create a New “Dataset”:
- In the “Resource Manager” pop-up window, click “New Resource”.
- In “Resource Type”, select “Dataset”.
- Configure the “Dataset”:
- In “Dataset API Name”, set it to “OppLineItem”.
- In “Object Name”, select “Opportunity Product”.
- In “How to Filter Records”, configure the following conditions:
- Field: Opportunity ID
- Operator: Equal
- Value: {!$Record.Id}
- In “How to Sort Records”, configure:
- Sort Order: Ascending
- Sort By: Opportunity Product Name
- In “How Many Records”, select the “Many Records” option and set the “Maximum Number of Records” to “99”.
- Save the “Dataset”:
- After configuring, click “Save” to save the “Dataset”.
- Add Dynamic Fields to the Table:
- Now that the “Dataset” has been created, you can add dynamic fields to the template table, such as:
- Quantity: {!OppLineItem.Quantity}
- Product Name: {!OppLineItem.ProductName}
- Unit Price: {!OppLineItem.UnitPrice}
- Total Price: {!OppLineItem.TotalPrice}
- Now that the “Dataset” has been created, you can add dynamic fields to the template table, such as:
Important Notes:
- Ensure the “Dataset” is correctly configured to avoid errors in generating the document.
- Test the document to ensure the products are listed as expected.
At the end of this section, you’ll find an illustrative image showing how to configure the “Dataset” and add dynamic fields to the table.
23. Inserting “Dynamic Fields” from the “Dataset” into the Template
Now that the “Dataset” has been created using the “Resource Manager”, the next step is to add the dynamic fields from the “Dataset” to the product table in the “Template Order” document. This topic will explain how to insert dynamic values for quantity, product name, unit price, total price, and the total amount from the “Opportunity”.
Steps to Add Dynamic Fields from the “Dataset”:
- Add the Quantity (“QTY”) Field:
- Locate the part of the table where it says “QTY”.
- Right-click and select the “Dynamic Fields” option.
- In “Select a resource from global variables”, choose the new option “Documents Resource”.
- In “Local Dataset”, select “OppLineItem”.
- In “Record Field”, choose the “Quantity” field.
- In the “Label and Value” option, select “Value”.
- The result will be: “{!$Dataset.OppLineItem.Quantity.Value}”.
Illustrative Image:
- Add the Product Name (“Product Name”) Field:
- Locate the part of the table where it says “Product Name”.
- Right-click and select the “Dynamic Fields” option.
- In “Select a resource from global variables”, choose “Documents Resource”.
- In “Local Dataset”, select “OppLineItem”.
- In “Record Field”, choose the “Name” field.
- In the “Label and Value” option, select “Value”.
- The result will be: “{!$Dataset.OppLineItem.Name.Value}”.
- Add the Unit Price (“Unit Price”) Field:
- Locate the part of the table where it says “Unit Price”.
- Right-click and select the “Dynamic Fields” option.
- In “Select a resource from global variables”, choose “Documents Resource”.
- In “Local Dataset”, select “OppLineItem”.
- In “Record Field”, choose the “UnitPrice” field.
- In the “Label and Value” option, select “Value”.
- The result will be: “{!$Dataset.OppLineItem.UnitPrice.Value}”.
- Add the Total Price (“Total Price”) Field:
- Locate the part of the table where it says “Total Price”.
- Right-click and select the “Dynamic Fields” option.
- In “Select a resource from global variables”, choose “Documents Resource”.
- In “Local Dataset”, select “OppLineItem”.
- In “Record Field”, choose the “TotalPrice” field.
- In the “Label and Value” option, select “Value”.
- The result will be: “{!$Dataset.OppLineItem.TotalPrice.Value}”.
- Add the Total Amount (“TOTAL”) Field:
- Locate the part of the table where it says “TOTAL”.
- Right-click and select the “Dynamic Fields” option.
- In “Select a resource from global variables”, choose “Record (Opportunity)”.
- In “Record Field”, choose the “Amount” field.
- The result will be: “{!$Record.Amount}”.
Important Notes:
- Ensure the dynamic fields are correctly configured to avoid errors in generating the document.
- Test the document to ensure the values are populated as expected.
At the end of this section, you’ll find an illustrative image showing how to add the dynamic fields from the “Dataset” and the “Opportunity” to the table.
24. Inserting “Variable”
In this section, we’ll create a new resource called “Variable” to add the payment due date and user contact information to the “Template Order” document. This topic will explain how to configure the variable and add dynamic fields related to the user.
Steps to Add the Variable and Dynamic Fields:
- Create the “paymentDueDate” Variable:
- Locate the text “Payment is due with:” in the document.
- Right-click and select the “Resource Manager” option.
- In the “Resource Manager” pop-up window, click “New Resource”.
- In “Resource Type”, select “Variable”.
- In “Variable API Name”, set it to “paymentDueDate”.
- This variable will be fetched from the Flow and will add the related payment due date.
- Add User Dynamic Fields:
- Locate the text “If you have any question, please feel free to research me:”.
- Below this text, add the following dynamic fields in separate paragraphs:
- User Name: {!$User.Name}
- User Email: {!$User.Email}
- User Phone: {!$User.Phone}
Important Notes:
- Ensure the variable and dynamic fields are correctly configured to avoid errors in generating the document.
- Test the document to ensure the values are populated as expected.
At the end of this section, you’ll find an illustrative image showing how to add the variable and dynamic fields to the document.
25. Configuring “Page Number” and “Page Count”
In this section, we’ll add the page number and total page count to the footer of the document. This will allow the user to identify which page they are on and how many pages the document has.
Steps to Add Page Number and Page Count:
- Access the Document Footer:
- Click on the footer area of the “Template Order” document.
- Add the Page Number Dynamic Field:
- Right-click and select the “Dynamic Fields” option.
- In “Select a resource from global variable”, choose the “Current Document” option.
- In “Record Field”, select the “Page Number” field.
- The result will be: “{!$Doc.PageNumber}”.
- Add the Page Count Dynamic Field:
- After the page number field, add the text “/”, then right-click again.
- Select the “Dynamic Fields” option.
- In “Select a resource from global variable”, choose the “Current Document” option.
- In “Record Field”, select the “Page Count” field.
- The result will be: “{!$Doc.PageCount}”.
- Format the Text:
- The final text in the footer should be:
- Page {!$Doc.PageNumber} / {!$Doc.PageCount}.
- The final text in the footer should be:
Important Notes:
- Ensure the dynamic fields are correctly configured to avoid errors in generating the document.
- Test the document to ensure the page number and page count are displayed as expected.
At the end of this section, you’ll find an illustrative image showing how to add the dynamic fields to the document footer.
26. “Save Template Order”
After completing all the steps to configure the “Template Order” document, the next step is to save the document to ensure all changes are stored correctly. This topic will explain how to save the document.
Steps to Save the Document:
- Access the “File” Menu:
- In the top-left corner of the screen, click on the “File” menu.
- Choose the “Save” Option:
- In the “File” menu, select the “Save” option.
- Alternatively, you can use the shortcut keys:
- Windows/Linux: Ctrl + S
- Mac: ⌘ + S
- Confirm the Save:
- The document will be saved with all the changes made.
Important Notes:
- Make sure to save the document after each change to avoid data loss.
- Verify that all configurations and dynamic fields are correct before saving.
At the end of this section, you’ll find an illustrative image showing how to save the document.
27. Creating an Action Button on the “Opportunity” Object
In this topic, we’ll create an action button on the “Opportunity” object to allow users to generate the “Template Order” document directly from an “Opportunity” record. This action button will call the “Generate Quotation” Flow to generate the document in PDF format.
Steps to Create the Action Button:
- Access the “Opportunity” Object Setup:
- In any “Opportunity” record, click the gear icon in the top-right corner and select “Setup”.
- In the left-hand menu, go to “Object Manager” and search for “Opportunity”.
- In “Opportunity”, click on “Buttons, Links, and Actions”.
- Create a New Action Button:
- Click on “New Action”.
- Configure the following information:
- Object Name: Opportunity
- Action Type: Flow
- Flow: Generate Quotation
- Label: Generate Quotation
- Name: GenerateQuotation
- Description: This button will create a block in Flow where it will generate an order.
- Click “Save” to save the action button.
- Add the Action Button to the Record Page:
- Return to an “Opportunity” record and click the gear icon in the top-right corner.
- Select “Edit Page”.
- This will open the “Lightning App Builder” related to the “Opportunity” record page.
- Add the Button to the “Highlight Panel”:
- In the “Lightning App Builder”, select the “Highlight Panel” component at the top of the page.
- In the properties panel on the right, click “Add Action”.
- In “Object-Specific Quick Actions”, select the “Generate Quotation” action button you created.
- Position the button so it’s visible to the user.
- Save and Activate the Page:
- Click “Save” to save the changes.
- Click “Activate” to activate the updated page.
Important Notes:
- Ensure the “Generate Quotation” Flow is correctly configured before creating the action button.
- Test the action button to ensure the document is generated as expected.
At the end of this section, you’ll find an illustrative image showing how to create and add the action button to the “Opportunity” record page.
28. “Generate Quotation”
In this topic, we’ll use the “Generate Quotation” action button to generate a quotation from the “ORDER TEMPLATE”. The document can be previewed, saved in Salesforce, and even printed or downloaded as a PDF.
Steps to Generate the Quotation:
- Check the “Opportunity” Record Fields:
- In an “Opportunity” record, ensure all necessary fields are filled out for the creation of the quotation document.
- Click the “Generate Quotation” Button:
- With the fields filled out, click the “Generate Quotation” action button located in the “Highlight Panel” of the “Opportunity” record page.
- Fill in the “Validity Date” Field:
- On the screen that appears, fill in the “Validity Date” field with a date greater than today’s date.
- Preview the Document:
- Click the “Preview Quotation” button to preview the generated document.
- Verify that all fields are correctly filled out and the information is as expected.
- Generate the Final Document:
- If everything is correct, click the “Generate Quote” button to generate the final document.
- If corrections are needed, return to the “Opportunity” record, make the necessary changes, and repeat the process.
- Download or Print the Document:
- After generating the document, you can:
- Download the PDF.
- Print the document directly.
- After generating the document, you can:
- Document Saved in Salesforce:
- The generated file will be automatically saved in Salesforce files, associated with the “Opportunity” record.
- If you want to delete or regenerate the document, simply repeat the process.
Important Notes:
- Ensure all necessary fields are filled out before generating the document.
- Preview the document to avoid errors or incorrect information.
At the end of this section, you’ll find an illustrative image showing the quotation generation process.
Conclusion and Final Thoughts – Automating Quotation Generation in Salesforce
In this content, we walked through all the steps required to create, configure, and automate the generation of a Quotation document in Salesforce using Docu2.me and Flow. Here’s a summary of what was done:
- Initial Setup:
- Created a new template in Docu2.me called “ORDER TEMPLATE”.
- Configured the “Generate Quotation” Flow to automate the document generation process.
- Adding Dynamic Fields:
- Added dynamic fields to the template, such as “Order Number”, “Bill To”, “From”, and user information.
- Created a “Dataset” to list products related to the “Opportunity”.
- Configuring Variables and Page Numbers:
- Added a variable for the payment due date (“paymentDueDate”).
- Configured page numbering and page count in the document footer.
- Creating an Action Button:
- Created an action button on the “Opportunity” object to call the “Generate Quotation” Flow.
- Added the button to the “Opportunity” record page for easy access.
- Generating the Document:
- Used the “Generate Quotation” button to generate the document, preview it, and save it in Salesforce.
- The document can be downloaded as a PDF, printed, or reused as needed.
Final Considerations
This detailed guide enabled the creation of an automated and efficient process for generating quotation documents in Salesforce. Here are some important considerations:
- Automation and Efficiency:
- The integration between Docu2.me and Flow provided a robust solution for document generation, eliminating manual tasks and reducing errors.
- Customization:
- The use of dynamic fields and variables allowed for highly personalized documents tailored to the specific needs of each “Opportunity” record.
- Ease of Use:
- The “Generate Quotation” action button simplified the process for users, enabling them to generate documents with just a few clicks.
- Storage and Access:
- The generated document is automatically saved in Salesforce, ensuring it’s always available for reference, download, or printing.
- Testing and Adjustments:
- It’s crucial to test each step of the process to ensure documents are generated correctly and all information is accurate.
With this content, you now have a complete and functional process for generating quotations in Salesforce, which can be adapted and expanded as needed.
Conclusion:
This guide was designed to help you automate and optimize document generation in Salesforce, providing greater efficiency and accuracy in your daily tasks. If you need further guidance or adjustments, I’m here to assist!