1. Understanding the Warranty Certificate Template
Description
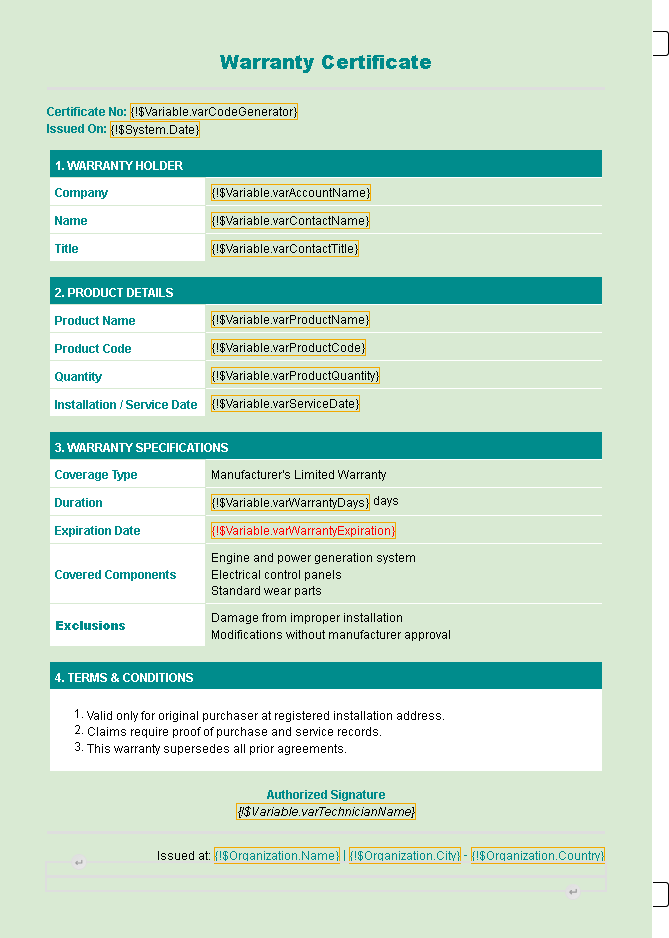
The Warranty Certificate Template is a dynamic, professional document designed to generate official product warranty certificates in Salesforce. This template leverages Salesforce Flow variables to automatically populate customer, product, and warranty information, creating personalized warranty documents that can be delivered to customers following product purchase or service installation.
Introduction to the “Warranty Certificate” Template
The Warranty Certificate Template offers a standardized yet customizable way to issue official warranty documentation to your customers. Created using docu2.me’s integration with Salesforce, this template transforms static warranty documents into data-driven certificates that pull information directly from Salesforce records. The template features a clean, professional design with corporate color scheme (teal/aqua), organized sections for warranty holder details, product information, warranty specifications, and terms and conditions.
Understanding Variables in Document Templates
What are Variables? In document templates, variables are placeholders that get replaced with actual data when the document is generated. Unlike static text which remains the same for every document, variables create dynamic content that adapts to each specific scenario.
In the context of this Warranty Certificate template, variables serve as the bridge between your Salesforce data and the final document. They allow the certificate to automatically populate with relevant information without manual data entry.
How Variables Work in This Template:
- Data Mapping: Each variable is mapped to a specific field from your Salesforce objects (Accounts, Contacts, Products, etc.)
- Syntax: Variables are identified in the template using the format
{!$Variable.varName} - Dynamic Replacement: When the document generates, each variable placeholder is replaced with the corresponding value from your Salesforce records
- Real-time Calculation: Some variables, like warranty expiration dates, can be calculated at generation time based on other variable values
- Conditional Formatting: Variables can control how certain sections appear based on the data values
Why Variables Are Central to This Template:
- They eliminate the need to manually create each warranty certificate
- They ensure accuracy by pulling data directly from your Salesforce records
- They allow for mass production of personalized warranty documents
- They maintain consistency across all warranty certificates
- They allow for automatic updates if customer or product information changes
This template showcases best practices for implementing variables in document generation, demonstrating how to structure a document that balances standardized content with dynamic, personalized information.
Key Features of the Template
- Variable-Driven Design: Built specifically to showcase effective use of variables for document customization
- Professional Design: Clean layout with color-coded sections and corporate styling
- Dynamic Data Fields: Auto-population with customer, product, and warranty information through variables
- Organized Structure: Four clearly defined sections covering all essential warranty information
- Unique Certificate Number: Generates a unique identifier for each warranty certificate
- Date Calculations: Automatically calculates and displays warranty expiration dates based on variable inputs
- Digital Signature Support: Includes space for technician or representative signature
- Company Branding: Incorporates organization details in the footer
- Responsive Formatting: Well-structured tables maintain professional appearance across devices
Fields Used in the Template
The template utilizes the following variables to populate dynamic content:
| Variable | Description | Section |
|---|---|---|
| varCodeGenerator | Unique certificate identification number | Header |
| varAccountName | Customer’s company name | Warranty Holder |
| varContactName | Customer’s contact name | Warranty Holder |
| varContactTitle | Customer’s job title | Warranty Holder |
| varProductName | Name of product covered by warranty | Product Details |
| varProductCode | Product identification code | Product Details |
| varProductQuantity | Number of products covered | Product Details |
| varServiceDate | Installation or service date | Product Details |
| varWarrantyDays | Duration of warranty in days | Warranty Specifications |
| varWarrantyExpiration | Calculated warranty end date | Warranty Specifications |
| varTechnicianName | Name of authorized technician/representative | Signature |
Additionally, the template uses several system variables:
{!$System.Date}– Current date for the “Issued On” field{!$Organization.Name}– Company name in document footer{!$Organization.City}and{!$Organization.Country}– Location information in footer
Why Use This Template?
- Variable-Powered Automation: Learn how to effectively use variables to create dynamic, data-driven documents
- Professionalism: Provides customers with official documentation of their warranty coverage, enhancing brand perception and customer confidence
- Efficiency: Eliminates manual warranty certificate creation, saving time and reducing errors
- Consistency: Ensures all warranty certificates follow the same format and contain the same essential information
- Automation: Can be configured to generate automatically after product purchase or installation
- Compliance: Helps maintain proper documentation of warranty terms for legal and service purposes
- Customization: Variables allow for personalization without compromising document structure
- Batch Processing: Can be implemented in batch processes to generate multiple certificates simultaneously
- Integration: Connects seamlessly with Salesforce data from Accounts, Contacts, Products, and Opportunities
- Record Keeping: Creates a documented history of warranty issuance that can be referenced for service fulfillment
- Customer Experience: Provides immediate confirmation of warranty to customers, enhancing their purchase experience
This template serves as an excellent example of how variables can transform static documents into dynamic, data-driven assets that streamline business processes while maintaining professional standards. By focusing on variable implementation, this template demonstrates best practices for organizations looking to automate their document generation processes.
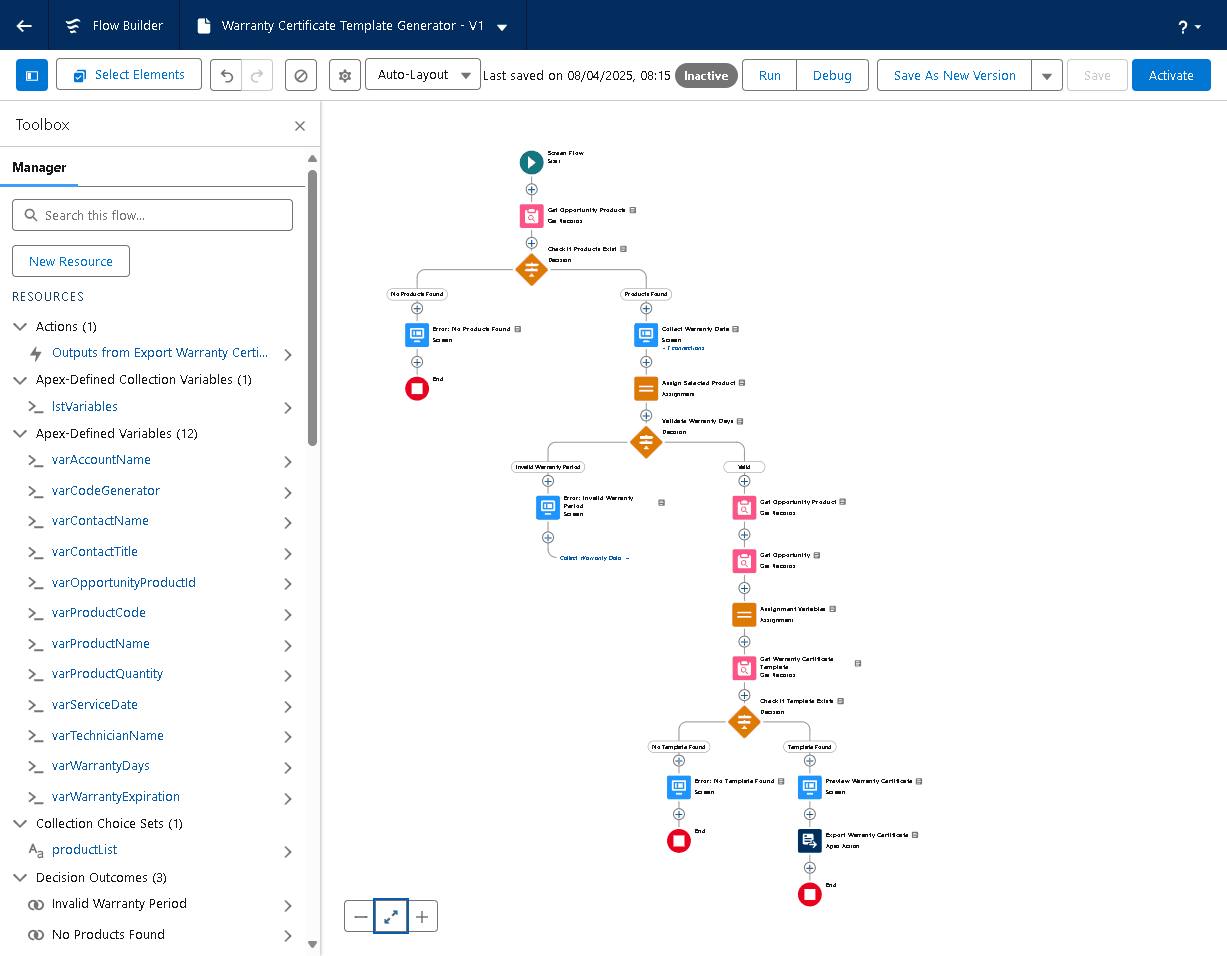
2. Creating Your Warranty Certificate Template in Salesforce
Accessing docu2.me and Setting Up a New Template
In this section, we’ll walk through the step-by-step process of creating a new Warranty Certificate template in Salesforce using the docu2.me app. This template will leverage variables to create dynamic, personalized warranty documents.
Step 1: Navigate to the docu2.me App in Salesforce
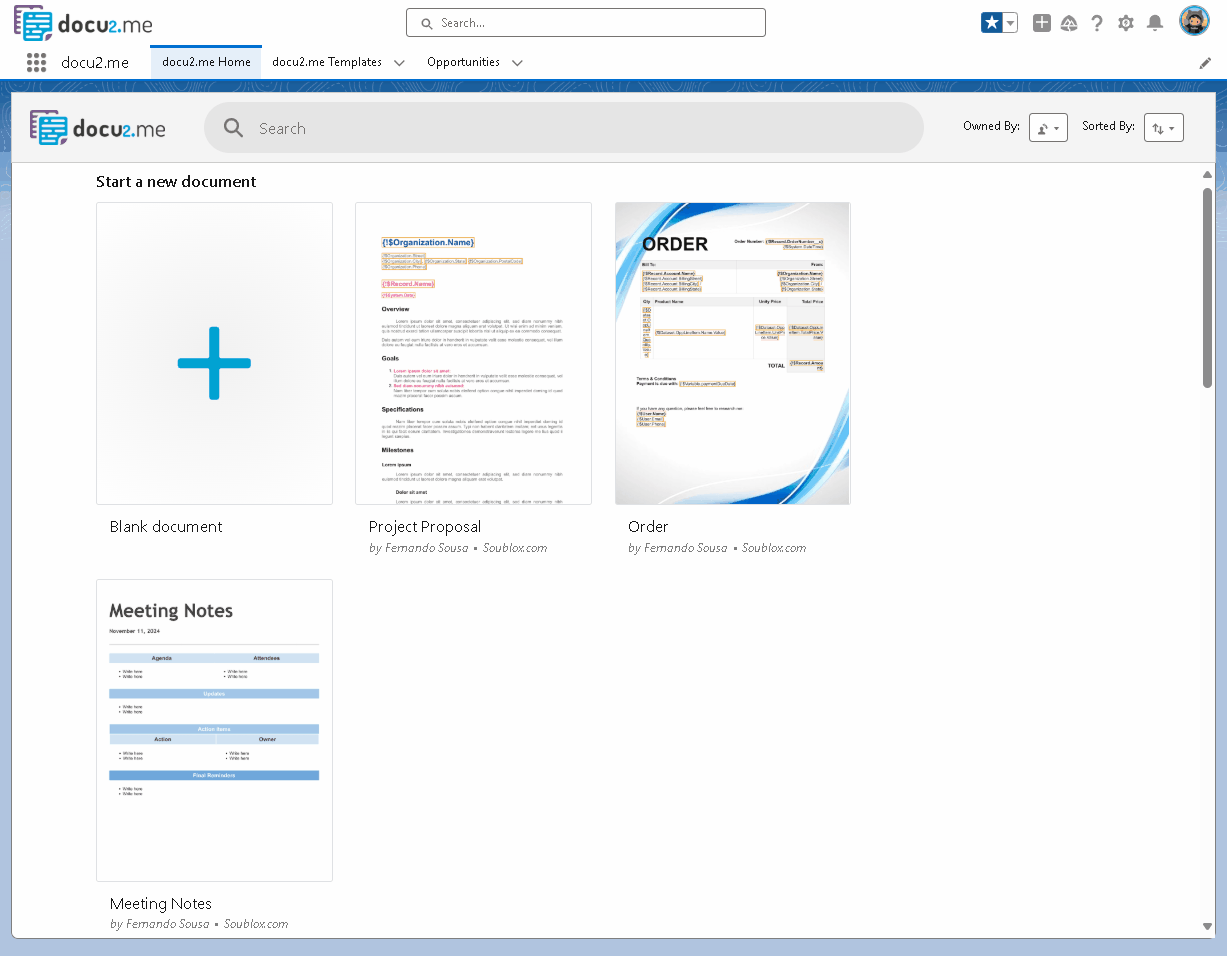
First, log in to your Salesforce account and locate the docu2.me application in the App Launcher. Click on the app to access the docu2.me main interface.
Step 2: Access the Templates Section
Once you’re in the docu2.me Home page, navigate to the “docu2.me Templates” tab. This is where all your document templates are stored and managed.
Step 3: Initiate Template Creation
On the Templates page, locate and click the “New” button in the upper right corner. This will open the template creation form where we’ll set up our Warranty Certificate template.
Step 4: Name Your Template
In the template creation form:
- Enter “Warranty Certificate” in the Template Name field
Step 5: Save Your Template Configuration
After entering the template name, click the “Save” button to create your new template record.
3. Building Your Template in the docu2.me Editor
Creating the Document Structure and Layout
After saving your template configuration, we’ll now build the actual document layout using the docu2.me Editor. This section guides you through creating a professional warranty certificate with properly structured information fields.
Step 1: Create a New Document
Click the “Create a Blank Document” button in the “docu2.me Files” section. This will open the docu2.me Editor with a blank document ready for editing.
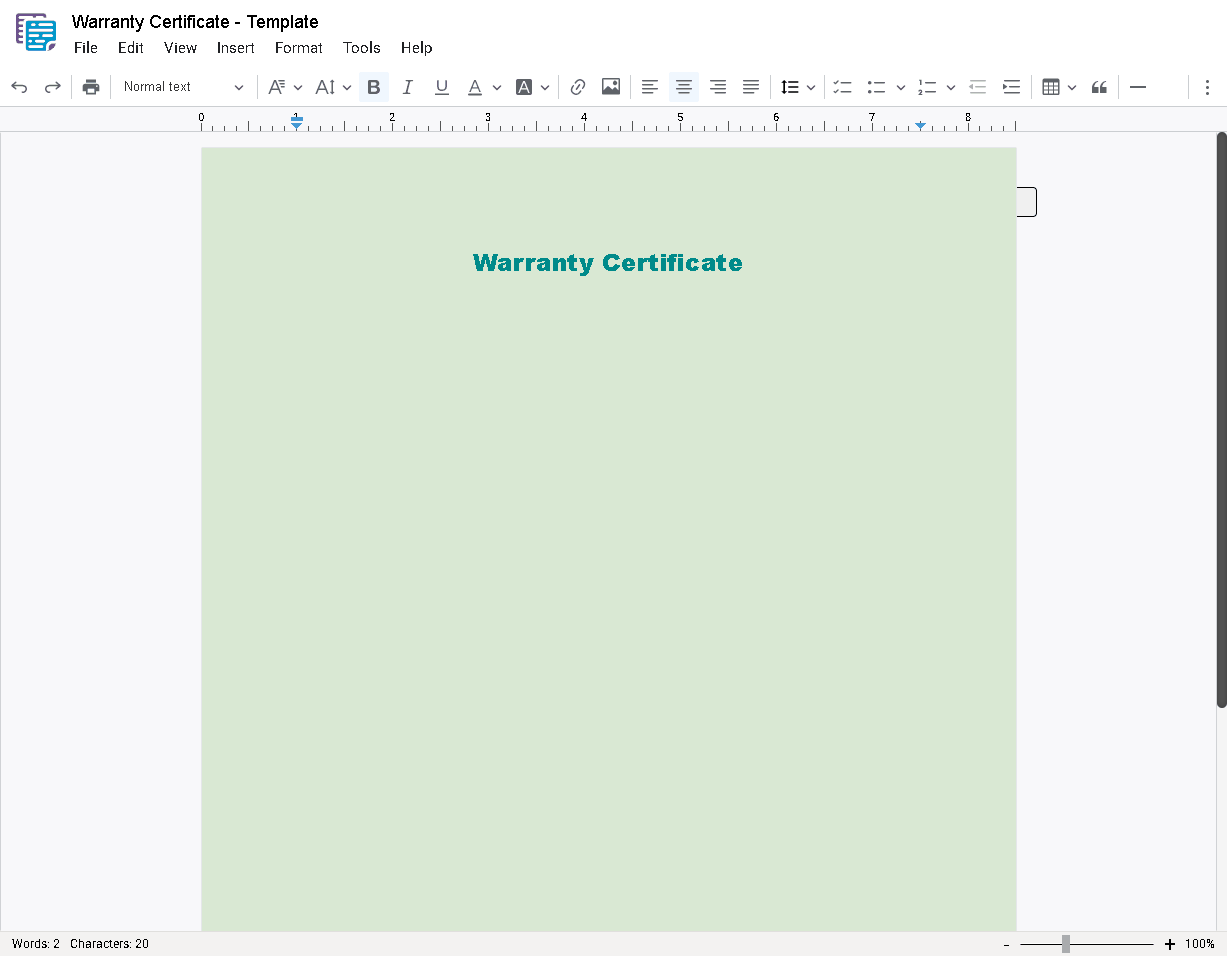
Step 2: Name Your Document
In the upper left corner of the editor, locate where it says “Untitled document” and change it to “Warranty Certificate – Template”. This ensures your work is properly identified in the system.
Step 3: Configure Page Background
To create a visually appealing certificate with a light green background:
- Click on the “File” menu
- Select “Page Setup”
- Navigate to the “Page Color” option
- Select a light green color from the palette

Step 4: Create the Certificate Framework
Now let’s build the structure of our warranty certificate with the following elements:
- Header Section
- Type “Warranty Certificate” as the main heading
- Add a line break
- Add “Certificate No:” text
- Add “Issued On:” text in the next paragraph
- Warranty Holder Section
- Create a table with 3 rows and 2 columns
- Merge the cells in the first row to create a header
- Add “1. WARRANTY HOLDER” to this merged header cell
- In the first column of subsequent rows, add:
- “Company”
- “Name”
- “Title”
- The second column will later contain variables for these fields
- Product Details Section
- Create a table with 5 rows and 3 columns
- Merge the cells in the first row across all columns
- Add “2. PRODUCT DETAILS” to this merged header cell
- In subsequent rows of the first column, add:
- “Product Name”
- “Product Code”
- “Quantity”
- “Installation/Service Date”
- The remaining columns will later contain variables and additional information
- Warranty Specifications Section
- Create a table with 6 rows and 2 columns
- Merge the cells in the first row
- Add “3. WARRANTY SPECIFICATIONS” to this merged header cell
- In the first column of subsequent rows, add:
- “Coverage Type”
- “Duration”
- “Expiration Date”
- “Covered Components”
- “Exclusions”
- The second column will later contain variables for these specifications
- Terms and Conditions Section
- Create a table with 2 rows and 2 columns
- Merge the cells in the first row
- Add “4. TERMS & CONDITIONS” to this merged header cell
- The second row will later contain the terms text
- Signature Area
- Add a paragraph with the text “Authorized Signature”
- Center this text
At this point, you’ve successfully created the basic structure of your warranty certificate template. The formatting can be adjusted according to your preferences to match your brand guidelines or organizational standards. In the next section, we’ll incorporate variables to make this template dynamic.
4. Adding Variables to Your Template
Creating Dynamic Data Fields
Now we’ll add variables to make our template dynamic, allowing for automatic personalization of the warranty certificate for each customer and product.
Important Considerations
- All variables mentioned in the formula must be defined in the flow
19 – Adding Action Element to Generate the Template
In this step, we will implement an Action element that will enable the effective generation of the warranty certificate in PDF format. This is the central component that transforms the template into a final document.
Action Element: Export docu2.me Files
Basic Settings
-
-
- Label: Export Warranty Certificate
- API Name: ExportWarrantyCertificate
- Description: Action that exports/generates the warranty certificate as a PDF document.
-
Specific Settings
-
-
- Export As: PDF
- Filename: Warranty_Certificate
- This can be ContentDocumentId, ContentVersionId or docu2.me Template Id: {!GetWarrantyCertificateTemplate.Id}
- Record Id utilized as the parent of the generated document: {!recordId}
- Variables Values: {!lstVariables}
-
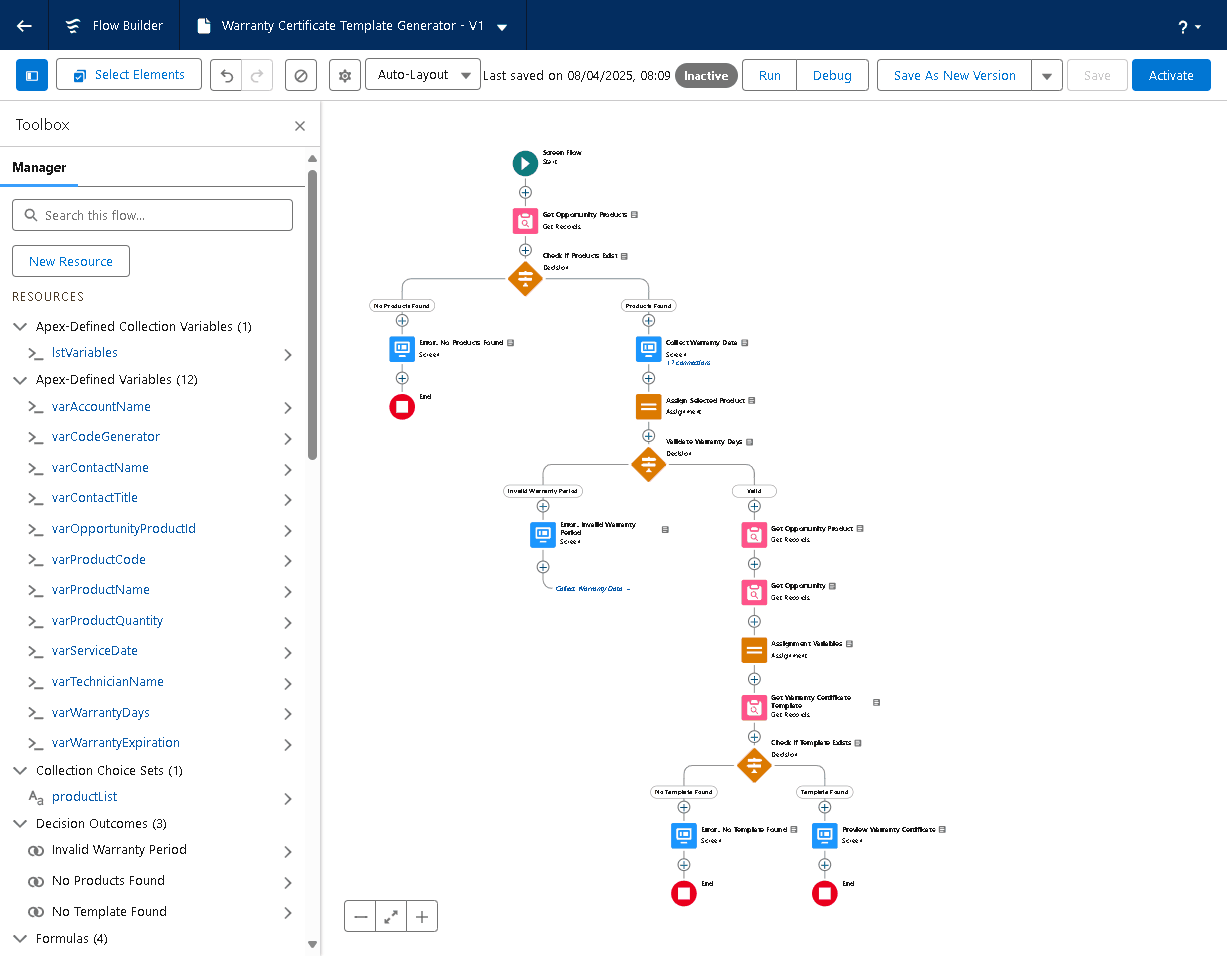
Configuration Process
-
-
- Add the Action element after the “Preview Warranty Certificate” Screen
- In the side panel for action configuration, search for “Export docu2.me Files”
- Configure the parameters as listed above
- Connect this action to the flow to be executed after the user clicks “Generate PDF”
-
Action Functionality
This Action element performs the following operations:
-
-
- Accesses the Template: Uses the template ID retrieved earlier
- Applies Variables: Injects the flow variable values into the document
- Generates the PDF: Converts the template with variables into a finalized PDF file
- Saves the Document: Stores the generated PDF as a file related to the specified record
-
Importance of Settings
-
-
- Export As: PDF: Defines the output format of the document
- Filename: Warranty_Certificate: Establishes a default name for the generated file
- Template Id: Identifies which template should be used as a base
- Record Id: Determines which record the generated document will be linked to
- Variables Values: Passes all variables needed to customize the document
-
Processing Flow
-
-
- The user views the certificate preview in the previous screen
- When clicking “Generate PDF”, this Action element is triggered
- The docu2.me integration processes the template with the provided variables
- A PDF file is generated and associated with the specified record
- The flow proceeds to the next step (which will be a success confirmation screen)
-
Important Considerations
-
-
- Processing Time: Depending on template complexity, generation may take a few seconds
- Error Handling: It’s recommended to implement error handling for cases when generation fails
- Permissions: Users need appropriate permissions to create files on the specified record
- Variables: All variables referenced in the template must be available in {!lstVariables}
-
This Action element is fundamental in the flow as it performs the main function of generating the PDF document, which is the ultimate goal of the entire process. In the next topic, we will implement a confirmation screen to inform the user that the certificate was successfully generated.
- Variable names (e.g., varAccountName) must exactly match the placeholders in the template
- URL format (with & between pairs) is essential for correct functioning
This element provides a complete user experience, allowing them to validate the document before officially generating it, saving time and resources.
20 – Finalizing the Template Flow
In this final step, we will add a confirmation screen that will be displayed after the successful generation of the warranty certificate. This screen provides clear feedback to the user about the completion of the process.
Screen Element: Certificate Generated Successfully
Basic Settings
- Label: Certificate Generated Successfully
- API Name: SuccessScreen
- Description: Screen that displays success message after generation.
- Show Header: false
- Hide Previous: true
- Hide Pause: true
Display Text Component
In this screen, we add a “Display Text” component to display the success message:
- API Name: SuccessMessage
- Text:
Warranty Certificate successfully generated!
The document has been downloaded as a PDF.
Placement in Flow
This Screen element should be added after the “Export Warranty Certificate” Action element that we implemented in the previous topic. It serves as the final step of the flow, indicating the successful completion of the process.
Success Screen Functionality
This confirmation screen has several important functions:
- Immediate Feedback: Clearly informs the user that the operation was completed successfully
- Download Confirmation: Clarifies that the PDF was generated and is available for download
- Process Closure: Signals the end of the workflow
Importance in the Flow
- User Experience: Provides a clear and positive closure to the process
- Visual Confirmation: Eliminates any uncertainty about whether the document was generated
- Guidance: Informs the user where to find the generated document
Final Flow Configuration
After adding this last screen, we have the following tasks to finalize the flow:
- Save the Flow: Click the “Save” button to save all the changes made
- Activate the Flow: Click “Activate” to make the flow available for use
- Test the Flow: Perform a final check to ensure everything works as expected
Next Steps
With the flow completely configured and activated, the next step will be creating an action button to trigger this flow from the user interface. This will allow users to initiate the warranty certificate generation process directly from the relevant record page.
Final Considerations
- Maintenance: Plan periodic reviews of the flow to ensure it continues to work as expected
- Documentation: Consider documenting the flow for future reference and for other administrators
- User Training: Prepare materials to guide users on how to use this new feature
With the completion of this flow, we have established an automated process for generating warranty certificates, significantly improving the efficiency and consistency of the operation.
21 – Creating an Action Button and Adding it to the Opportunity Object
In this final step, we will create a custom action button and add it to the Opportunity object, allowing users to easily initiate the warranty certificate generation flow directly from the record page.
Creating the Action Button
- Navigate to any Opportunity record
- Click on the gear icon (Setup) and select “Edit Object”
- In the object configuration page, go to the “Buttons, Links, and Actions” tab
- Click the “New Action” button
Action Button Configuration
Configure the new action button with the following information:
- Object Name: Opportunity
- Action Type: Flow
- Flow: Warranty Certificate
- Standard Label Type: –None–
- Label: Generate Warranty Certificate
- Name: GenerateWarrantyCertificate
- Description: This button will create a block in Flow where it will generate an Warranty Certificate.
- Click “Save” to create the custom action button
Adding the Button to the Opportunity Page Layout
- Navigate back to any Opportunity record
- Click on the gear icon (Setup) and select “Edit Page”
- In the Lightning App Builder, locate and select the “Highlights Panel” component
- In the lower section of the properties panel, find the “Actions” section
- Click “Add Action”
- Find and select the newly created “Generate Warranty Certificate” button
- Move this button to the first position in the action list for greater visibility
- Click “Save” to apply the changes to the page layout
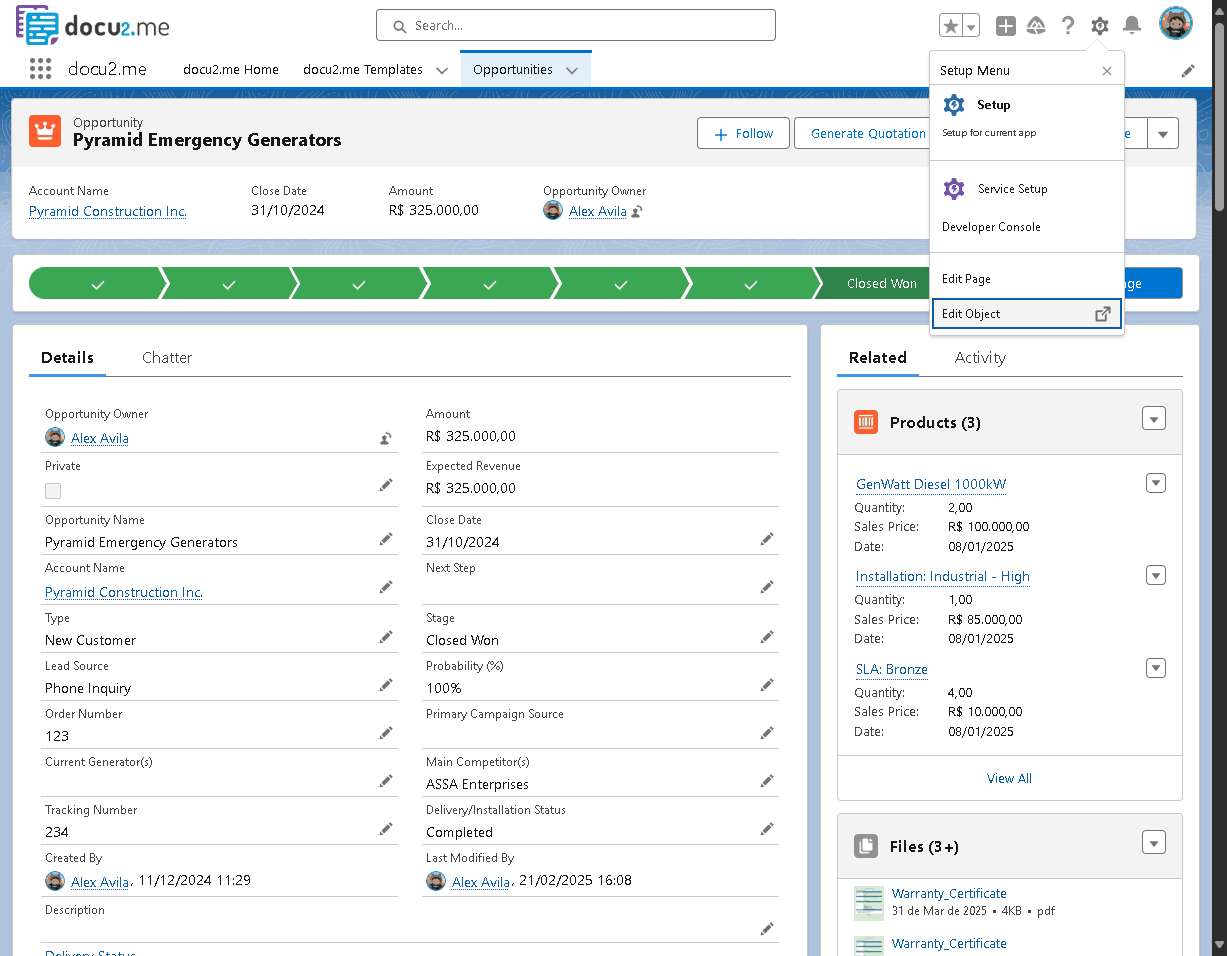
Testing the Functionality
Now that we have configured the button and added it to the page layout, we can test the complete functionality:
- Navigate to an Opportunity record
- Observe the new “Generate Warranty Certificate” button in the actions section of the highlights panel
- Click the button to initiate the flow
Possible Scenarios:
- With associated product: The flow will display a preview of the warranty certificate in PDF. You can view the document and click “Generate PDF” to create the final file.
- Without associated product: The flow will display a message informing that there are no products registered to generate a warranty certificate.

Project Conclusion
With this step, we have completed the full implementation of the warranty certificate generation solution. The solution now allows:
- Selecting a product associated with an opportunity
- Entering specific certificate information (technician, warranty days, etc.)
- Automatically generating the unique warranty code
- Calculating the warranty expiration date
- Previewing the certificate before final generation
- Generating the final PDF document
- Receiving confirmation of successful generation
This solution significantly optimizes the warranty certificate generation process, eliminating manual tasks and ensuring consistency in the formatting and content of certificates.
Benefits Achieved:
- Operational Efficiency: Drastic reduction in the time required to create warranty certificates
- Consistency: All certificates follow the same format and structure
- Error Reduction: Minimization of human errors in document creation
- Better Customer Experience: Faster and more professional delivery of certificates to customers
- Traceability: Systemic registration of all generated certificates linked to opportunities
With this implementation, the team now has a powerful and integrated tool to manage warranty certificates directly within the Salesforce platform.